Battery switch on travel trailer function is crucial for managing your RV’s power. Understanding how this simple yet vital component works is key to preventing dead batteries and ensuring a smooth camping experience. This guide will walk you through different switch types, wiring, troubleshooting, and maintenance, empowering you to confidently handle your travel trailer’s electrical system.
We’ll cover everything from the basics of single-pole switches to the more complex double-pole double-throw setups, explaining the pros and cons of each. You’ll learn how to correctly wire your switch, avoid common mistakes, and troubleshoot problems effectively. We’ll even delve into integrating solar panels with your battery switch for a more sustainable power solution. By the end, you’ll be a battery switch expert!
Battery Switch Types in Travel Trailers
Choosing the right battery switch for your travel trailer is crucial for managing your power sources efficiently and safely. Different types offer varying levels of control and protection, each with its own set of pros and cons. Understanding these differences will help you select the best option for your needs.
Types of Battery Switches
Travel trailers commonly utilize several types of battery switches, each designed for specific power management scenarios. The most common types are single-pole, double-pole, and double-pole double-throw switches. These switches control the flow of electricity from your batteries to your trailer’s electrical system.
Single-Pole Battery Switches
A single-pole switch controls only one circuit. In a travel trailer context, this typically means it manages power to either your house batteries or your chassis battery, but not both simultaneously. It’s a simple, cost-effective solution, but its limited functionality can be a drawback for those needing more complex power management.
So, you’re an audiophile who loves to travel? Awesome! Make sure you check out this guide on setting up your audiophile travel setup before your next trip – you’ll want pristine sound wherever you go. And while you’re planning, don’t forget travel insurance! Getting Aon travel insurance is a smart move to protect your gear and yourself, ensuring a smooth and worry-free adventure.
Double-Pole Battery Switches
A double-pole switch controls two circuits simultaneously. This is generally used to isolate both positive and negative terminals of your battery bank from the trailer’s electrical system. This added safety feature prevents accidental short circuits and protects against electrical hazards. Compared to single-pole switches, double-pole switches provide a higher level of safety.
Double-Pole Double-Throw (DPDT) Battery Switches
A DPDT switch offers the most versatility. It allows you to select between multiple power sources, such as connecting to shore power, using your house batteries, or combining both. This is ideal for managing power from various sources and ensuring a seamless transition between them. The added complexity comes with a higher price point.
Comparison of Battery Switch Types
| Switch Type | Circuits Controlled | Safety Features | Applications |
|---|---|---|---|
| Single-Pole | One | Basic | Simple battery isolation, low-cost applications |
| Double-Pole | Two (positive and negative) | Improved safety (isolates both terminals) | Enhanced safety, typical for house battery banks |
| Double-Pole Double-Throw (DPDT) | Multiple power sources selectable | Improved safety, source selection | Advanced power management, multiple battery sources |
Function of the Battery Switch
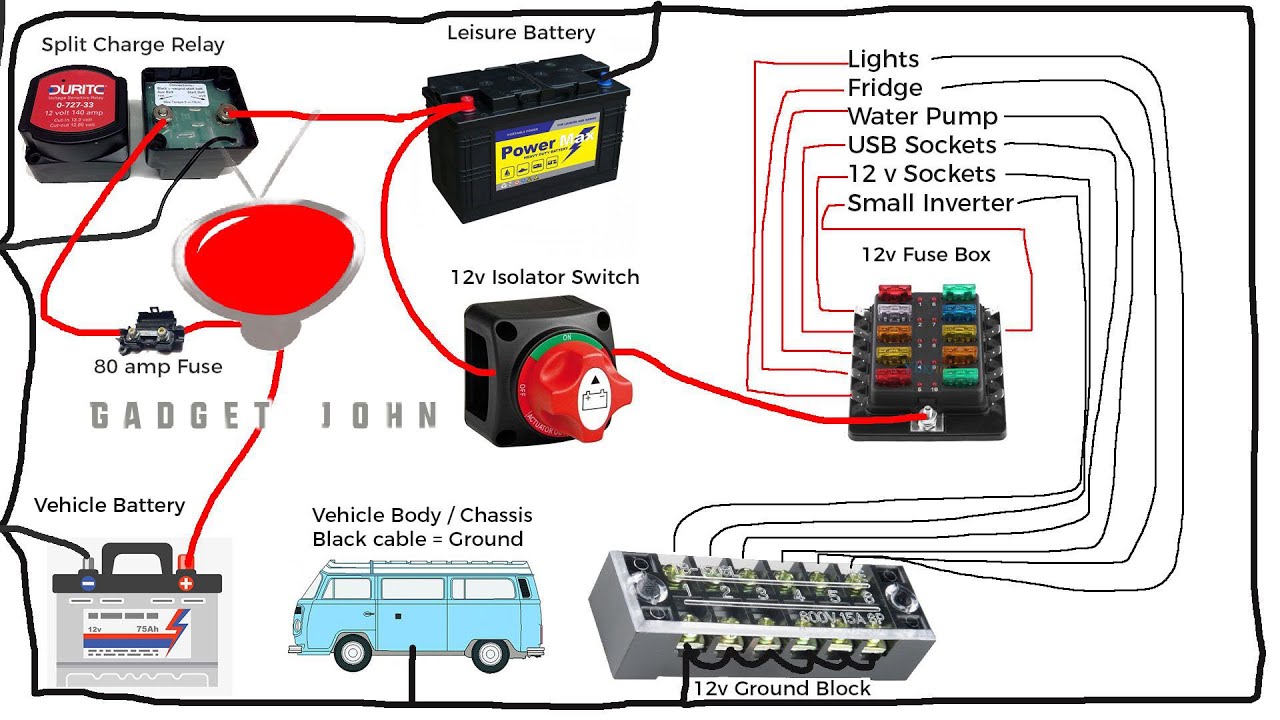
The battery switch in your travel trailer is a crucial component that controls the flow of power between your house battery (which powers your trailer’s appliances) and your vehicle’s charging system. It’s essentially a master on/off switch, but with added safety and management features depending on the type of switch installed. Understanding its function is key to maintaining your trailer’s battery and preventing unexpected power failures.The primary role of the battery switch is to disconnect the house battery from the trailer’s electrical system when the trailer isn’t connected to your tow vehicle or plugged into shore power.
This prevents parasitic drain – the slow but steady depletion of battery power caused by small appliances or electronics drawing power even when turned off. Leaving the battery connected without a charging source will eventually lead to a dead battery, requiring a jump start or replacement. The battery switch acts as a safety net, safeguarding your investment and ensuring you’re ready for your next adventure.
Battery Switch and Power Flow Management
The battery switch acts as a gatekeeper for electrical current. When the switch is in the “on” position, it allows power to flow from the house battery to the trailer’s 12-volt system, powering lights, water pumps, and other appliances. Simultaneously, it allows charging current from your vehicle’s alternator or a shore power converter to replenish the battery. Conversely, when the switch is “off,” it completely isolates the house battery from the rest of the trailer’s electrical system, preventing any drain.
This isolation is critical for long-term storage when your trailer isn’t in use.
So, you’re an audiophile who loves to travel? Awesome! Make sure you check out this guide on audiophile travel setup to keep your ears happy on the go. It’s crucial to protect your investment, and that includes getting the right travel insurance. Consider looking into Aon travel insurance for comprehensive coverage; you’ll want peace of mind knowing your gear is protected during your adventures.
Planning ahead ensures a smooth and enjoyable trip for both you and your precious audio equipment.
Safety Features of Battery Switches
Different battery switch designs incorporate various safety features. Simple on/off switches offer basic isolation. More advanced switches, like those with multiple positions, might include an “off” position for complete disconnection, a “battery” position for using only the house battery, and a “battery + charge” position to allow charging while also using the house battery. Some switches also include a built-in circuit breaker or fuse as an added safety measure to protect against overloads and short circuits.
This prevents potential damage to your battery and electrical system. A properly functioning battery switch is essential for preventing electrical fires and ensuring the safety of your trailer and its occupants.
Troubleshooting Battery Switch Issues
Dealing with a malfunctioning battery switch in your travel trailer can be frustrating, but with a systematic approach, you can usually pinpoint and fix the problem. Understanding the common causes and employing safe troubleshooting techniques will get you back on the road quickly and safely. Remember, working with electricity requires caution; always prioritize safety.
Battery switch problems stem from a few key areas: the switch itself, the connections to the switch, and the associated fuses or circuit breakers. A faulty switch might simply be worn out or damaged from age and use, while corroded connections create resistance and can lead to poor performance or even complete failure. Blown fuses indicate an overload somewhere in the system, requiring investigation to find the root cause.
Common Battery Switch Problems and Troubleshooting Steps
Addressing battery switch issues involves a methodical approach. Begin by visually inspecting the switch and connections, then proceed to more involved checks. Remember to always disconnect the negative battery cable before starting any electrical work.
- Visually Inspect the Switch and Connections: Look for any obvious damage to the switch itself, such as cracks or burn marks. Carefully examine all connections for corrosion. Green or white powdery residue indicates corrosion, which needs to be cleaned. Loose connections can also cause problems.
- Check the Fuses or Circuit Breakers: Locate the fuses or circuit breakers associated with the battery switch. A blown fuse will show a broken filament or a tripped breaker will be in the “off” position. Replace blown fuses with fuses of the same rating. If a fuse blows repeatedly, there’s a short circuit somewhere in the system requiring further investigation.
- Test the Switch Functionality: With the negative battery cable disconnected, use a multimeter to test the continuity of the switch in its various positions. This verifies whether the switch is making and breaking the circuit correctly. If it’s not, the switch needs replacement.
- Clean Corroded Connections: If corrosion is present, carefully clean the terminals with a wire brush and baking soda solution. Apply a dielectric grease to the cleaned connections to prevent future corrosion. Ensure all connections are tight and secure.
- Inspect Wiring: Examine the wiring leading to and from the battery switch for any damage, such as frayed wires or exposed conductors. Repair or replace any damaged wiring.
Safety Precautions When Working with Travel Trailer Electrical Systems, Battery switch on travel trailer function
Working with electricity can be dangerous. Always prioritize safety to avoid injury or damage to your equipment. The following precautions are crucial when troubleshooting your battery switch.
- Disconnect the Negative Battery Cable: Before performing any work on the electrical system, always disconnect the negative (-) battery cable. This prevents accidental shocks and short circuits.
- Use Insulated Tools: Use insulated screwdrivers and pliers to prevent accidental contact with live wires.
- Wear Safety Glasses: Protect your eyes from sparks or flying debris.
- Work in a Well-Lit Area: Good lighting improves visibility and reduces the risk of mistakes.
- Consult a Professional if Needed: If you are uncomfortable working with electrical systems, consult a qualified RV technician or electrician.
Battery Switch and Solar Panel Integration
A battery switch is a crucial component in a travel trailer’s electrical system, and its interaction with a solar panel charging system is vital for efficient power management. Understanding how these two systems work together ensures your batteries are charged effectively and you avoid potential problems.Solar panels generate DC power, which needs to be regulated and directed to the batteries for storage.
The battery switch controls the flow of power from the batteries to the trailer’s appliances and accessories. Its integration with the solar system dictates how the solar-generated power charges the batteries and how that power is subsequently used. Proper integration ensures the solar panels efficiently charge the batteries, even when the battery switch is in different positions.
Solar Panel Charging System Interaction with Battery Switch
The interaction depends on the type of battery switch and the solar charge controller configuration. With a simple on/off switch, the solar charge controller will charge the batteries regardless of the switch’s position (assuming the controller is wired correctly to the battery bank). However, with more sophisticated switches, like those with multiple banks or a “disconnect” position, the interaction becomes more complex.
In some setups, placing the switch in the “off” or “disconnect” position may interrupt the solar charging process, preventing the panels from charging the batteries. In other setups, the solar charge controller might be wired to bypass the battery switch entirely, ensuring continuous charging regardless of the switch’s position. This bypass is often the preferred method for reliable solar charging.
Implications of Different Solar Panel Configurations
Different solar panel configurations affect how the battery switch integrates with the system. For example, a single solar panel system usually presents fewer complications than a system with multiple panels in series or parallel. With multiple panels, careful wiring is essential to ensure the charge controller receives the correct voltage and amperage. The battery switch should be placed after the charge controller to prevent interrupting the charging process, regardless of the panel configuration.
Incorrect placement could lead to overcharging, undercharging, or damage to the system components. A well-designed system will use appropriate fuses and circuit breakers to protect against overloads and short circuits, further enhancing safety and reliability.
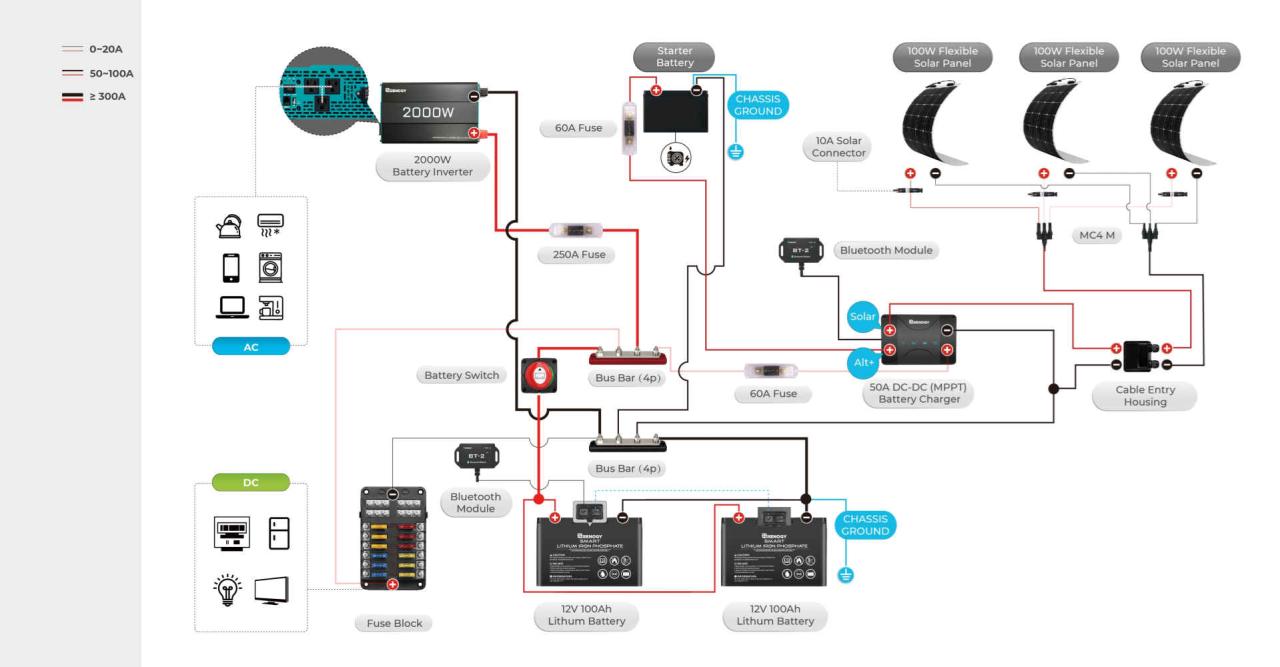
Wiring Diagram: Battery Switch and Solar Panel Integration
This diagram describes a typical setup where the solar charge controller bypasses the battery switch to ensure continuous charging. Components:* Solar Panels: Multiple panels connected in series or parallel to produce the desired voltage and current.
Solar Charge Controller
Regulates the voltage and current from the solar panels to prevent overcharging the batteries.
Battery Switch
A multi-position switch (e.g., 2-position or 3-position) that controls power to the house batteries.
House Batteries
Deep-cycle batteries providing power to the travel trailer’s appliances.
Fuses/Circuit Breakers
Protection devices to prevent overcurrent situations. Wiring Description:The solar panels are connected to the solar charge controller. The charge controller is directly connected to the house batteries (positive to positive, negative to negative). The battery switch is connected to the positive and negative terminals of the house batteries. The load side of the battery switch (the side that connects to the trailer’s appliances) is connected to the appliances.
Fuses are incorporated on both the solar panel side (before the charge controller) and the battery side (before the battery switch and after the charge controller) to protect the system from overcurrents.
Note: This is a simplified diagram. More complex systems might incorporate additional components like battery monitors, inverters, and other safety devices. Always consult a qualified electrician for installation and wiring of any electrical system in a travel trailer.
Mastering your travel trailer’s battery switch is a game-changer. From preventing costly battery drain to safely integrating solar power, understanding its function and maintenance ensures worry-free adventures. This guide has equipped you with the knowledge to confidently tackle any battery switch challenge, keeping you powered up and ready for the open road. Remember regular inspection and proper wiring are key to a long-lasting and reliable system.
Query Resolution: Battery Switch On Travel Trailer Function
What happens if my battery switch is left in the “off” position?
Leaving the switch off completely disconnects the house battery from the charging system, preventing it from charging. This will lead to a dead battery if you’re not using shore power or a generator.
Can I use any type of battery switch in my travel trailer?
No, the correct switch type depends on your trailer’s electrical system and battery configuration. Using an incorrect switch could damage your equipment or create a safety hazard.
How often should I inspect my battery switch connections?
At least twice a year, or more often if you frequently use your trailer. Look for corrosion, loose connections, and signs of overheating.
My battery switch is clicking but not engaging. What’s wrong?
This could indicate a faulty switch, corroded connections, or a blown fuse. Check these components before replacing the entire switch.
